Join now! 6 Ways to Refresh your Centre's Online Joining Experience
What are your members really looking for in your gym or leisure centre’s joining process? At a simple level, it’s really the same as what they’re looking for in any other online shopping experience – they’re searching for a product or service that meets their needs and will help solve a problem or reach a goal. And they want to get there in a straightforward way.

Meet Sara. She’s just moved to the area and is on the lookout for a leisure centre to join. As an avid swimmer, she’s keen to find one soon so she can get back in the pool and hopefully meet some like-minded people in the area. She’s never heard of any of the local leisure centres before so she’s starting her search by browsing online and stumbles across your organisation. How do you help Sara find and buy the perfect membership for her?
We’ve narrowed it down to 6 handy tips:
1. How to begin? Signpost where to go – a confusing online experience is beyond frustrating. We shouldn’t have to think about where to click next on a page or get ‘lost’ along the way, it should all be intuitive with a few straightforward steps. Signpost your prospective customers with a clear ‘Join Us’ or ‘Join Now’ button displayed prominently on the homepage of your website. Having to hunt around for that might be enough for someone to lose interest and choose another local leisure centre. Don’t miss out on attracting new members like Sara by missing such a simple thing!

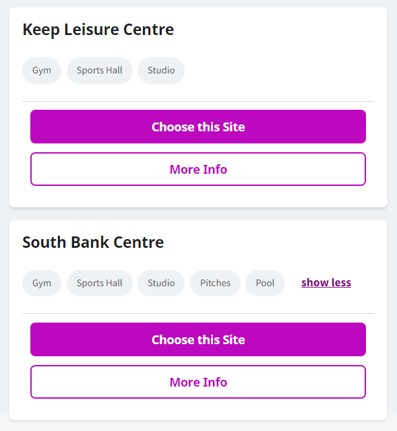
2. Clearly list facilities at each site – Do you have multiple sites in a similar area? That’s great, but don’t just assume that people will automatically know the difference between your sites! As someone new to the area, Sara has no clue whether your ‘Keep Centre’ is for badminton, swimming, athletics or all of the above. Facilities available at each site need to be obvious. As Sara is looking for a site with a pool, she doesn’t want to waste her time looking at gym-only sites. With a clear list of facilities available at each site, she can quickly narrow the sites down to the ones with pools without having to click in and out of multiple pages.

4. Describe your memberships - So, Sara’s narrowed it down to your site with a pool. Tick. But that doesn’t mean she’s necessarily going to opt for a swim-only membership. She’s keen to try a few classes and is thinking about using the gym as well but isn’t too sure how to get started. This is where your membership descriptions come in. We recommend that you accurately describe what’s included in each membership and how this will benefit your customers. Maybe you want to share that you have classes that cater for all fitness levels, or that you have PTs available for specific training needs? Whatever it is you offer, paint that picture and show your customers how the membership will help them achieve their fitness goals.
Sara’s been inspired by your description of the gym and classes and has chosen an all-round swim and gym membership, well done!
5. Display your prices – But how much does it cost? We’ve all been there. We’ve found the perfect product or service and have spent a while reading all the details only to click through to find out more and discover it’s completely out of our price range. Hiding prices will do nothing but frustrate customers! It shouldn’t be a guessing game, and instead, prices should be displayed clearly next to membership options without having to ‘login or register’ first.
But based on all the great features you’ve described in her chosen membership, Sara definitely thinks it’s value for money so is keen to proceed to payment and get started at your centre.
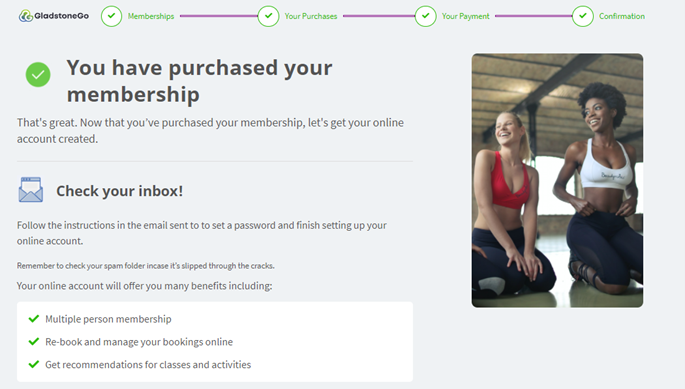
6. Confirm their purchase – Sara’s bought her membership. Or at least she thinks she has…don’t leave your customers hanging! Once a purchase has gone through, they should be directed to a confirmation page and receive an email so they can rest assured that their payment went through and they’re officially the proud owner of a new membership.

And there we have it, our six steps to providing a simple joining journey! These tips will help you hit that sweet spot of providing your soon-to-be members with enough information to make an informed decision without overloading them with unnecessary details. Just remember, if a user gets confused or has to second-guess their selection at any point throughout the process then your joining flow hasn’t been successful and it’s time to have a bit of a rethink.
Are you interested in optimising your online joining process and creating the best user experience you can? We’ve designed our new cloud-native platform, GladstoneGo, around an intuitive user experience that will allow you to do exactly that. Why not book a demo to see for yourself just how simple joining and booking can be?
Share this
You May Also Like
These Related Stories
.png)
Streamlining Your Leisure Centre's DD Journey: The Power of SMS Rejection Comms
.png)
GladstoneGo: Joining Just Got a Whole Lot Simpler
.png)


No Comments Yet
Let us know what you think